
프로그래밍
- 이클립스 TOP 단축키 2016.08.02
- Youtube 영상 반응형으로 삽입하기 2016.08.02
- PHP MySQL을 이용한 데이터베이스 편집 2016.05.30
- PHP MySQL을 이용한 데이터베이스 생성 2016.05.26
- PHP 함수 2016.05.25
- PHP 배열 2016.05.24
- PHP 변수와 문자열 2016.05.24
출처 : http://romankukla.blogspot.kr/2012/11/eclipse-top-hotkeys.html
Use your hands to write code
You should try to keep your hands on keyboard. The less you touch the mouse, the more code you can write. I am trying to keep the mouse laying still and control the IDE completely using keyboard. What do you think is faster: pressing ALT + C or right clicking the project, selecting Team -> Commit?
- CTRL + D
- Delete row. Try it! You no more need to grab the mouse and select the line, no more Home, Shift + End, Delete. Quick and clean.
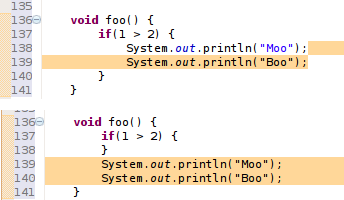
- ALT + Up/Down Arrow
- Move the row (or the entire selection) up or down. Very useful when rearranging code. You can even select more rows and move them all. Notice, that it will be always correctly indented.
- ALT + Left/Right Arrow
- Move to the last location you edited. Imagine you just created a class Foo, and now you are working on a class Boo. Now, if you need to look at the Foo class, just press Alt+Left Arrow. Alt+Right Arrow brings you back to Boo.
- CTRL+SHIFT+O
- Organize imports. What happens when you first use a class you have not yet imported? You will see an error. But when you press this magical combination, all your missing classes will be imported, and the unused imports will vanish.
- CTRL+1
- Probably the most useful one. It activates the quick fix. Imagine you create a class, which implements some interface. You will get an error, because the inherited methods are not yet implemented. While you are on line where the error occurs, press this combination to activate the quick fix. Now, select the "Add unimplemented methods" option. You can use the quick fix at every error you ever receive.
Quick fix comes handy in other situations too. My favorite is the "Split variable declaration". Sometimes I need to broaden the scope of a variable. I activate the quick fix, split declaration, and use alt + arrow to put it where it belongs. You can find even more usages: Convert local variable to field, rename in file, Inline local variable..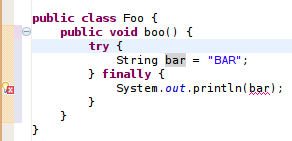
You could use the "Split variable declaration" on the bar variable, and then move it with Alt+Arrows above the try block..
Or you could use the "Add unimplemented methods" fix here.
The best thing you can do if you see an error is to use the quick fix. - CTRL+SHIFT+T
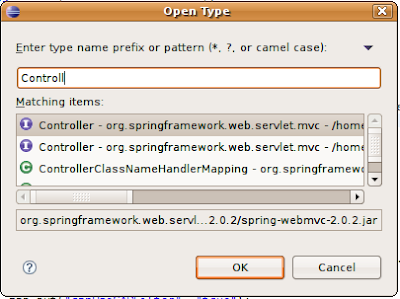
- Open Type. Imagine, that you need to have a look at the Foo class. But, where is the Foo class? Is it in the Boo project and in the foo.bar package? Or somewhere else? With this shortcut, you don't need to know. Just press it, type Foo and you are in.
- CTRL+E
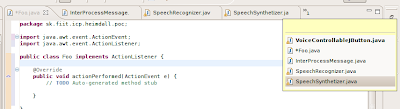
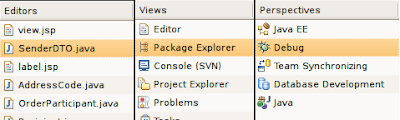
- Shows you a list of all open editors.
- CTRL+F6
- Use to move between open editors. This is an slower alternative to Ctrl + E. Comes handy in a situation when you want to periodically switch between two editors, something, what is nearly impossible with Ctrl+E as it sorts entries quite randomly. Or you might just use Alt+Arrows..
- CTRL+F7
- Move between views. When in editor, press Ctrl+F7 to switch to the Package Explorer, or hold Ctrl and press F7 multiple times to switch to other views.
- CTRL+F8
- Move between perspectives. The same as previous.
- CTRL + F11
- Runs the application. What gets launched depends on your settings. It will either launch the last launched class (my preffered way) or it will launch currently selected resource (the default way). If you want to change its behavior read the previous post.
- CTL + N
- Open new type wizard. This is not very quick because you have to select the wizard type (weather you want to create new class, jsp, xml or something else) in the next step. Much faster way would be if you could just hit the shortcut and invoke the particular wizard. It is possible, just keep reading..
- CTRL + M
- Maximize or umaximize current tab.
- CTRL + I
- Corrects indentation.
- CTRL + SHIFT + F
- Formats code. You can make a beautiful looking code out of a mess with this. It requires a bit of setup, but it is well worth it. You can find its settings under Window->Preferences->Java->Code style->Formatter
- CTRL + J
- Incremental search. Similar to the search in firefox. It shows you results as you type. Don't be surprised, if you hit this combination, nothing happens - at the first glance. Just start typing and eclipse will move your cursor to the first ocurence.
- CTRL + SHIFT + L
- Shows you a list of your currently defined shortcut keys.


I don't like your shortcuts
Such is life nowadays. Remember, you can always change those bindings to match your preferences. Open Windows->Preferences->General->Keys. Now you can use the filter to find your shortcut and change its binding.

While you are here, I recommend to add the following bindings:
- CTRL+SHIFT+G
- Bind this to "Generate getters and setters". This is a "must have".
- ALT+C
- Bind this to SVN/CVS "Commit".
- ALT+U
- Bind this to SVN/CVS "Update".
Now, type "new" (without quotes) in the filter text. You should see a list of all new type wizards. Choose the most frequently used and assign them a shortcut. For example, the most used wizard for me is the new class wizard. Thus I assigned it the CTRL+SHIFT+N keys.
Let me demonstrate a quick way to create new class now.
Hit CTRL + SHIFT + N (or the combination you assigned in the previous step). This should bring up new class wizard. Type in the name and press ALT+E. You can now select a class which will be a superclass for the newly created class. Hit ALT+A and select all implemented interfaces . Now hit ALT+F and your class will be generated. Eclipse will also provide the default implementation for all abstract and interface methods you inherited.

I think that using shortcut keys is the fastest way to productivity and if not, then at least your wrists will say you a silent thanks. Now, don't wait, go on and assign keys to the features you use most.
The problem is that there are so many keyboard shortcuts. I used to keep a printout with all the shortcuts I wanted to use. Finally I wrote an Eclipse plugin MouseFeed, which reminds the keyboard shortcuts for the actions called with mouse. You can even tell it to enforce some shortcuts - the action will run only if called with a keyboard shortcut.
[ 1 ] 반응형 영상 삽입하기
<script src="//www.youtube.com/iframe_api"></script>
<div class = "embed-responsive embed-responsive-16by9">
<iframe class="embed-responsive-item" src="https://www.youtube.com/embed/6I3haFbNA_g?playlist=6I3haFbNA_g&autoplay=1&rel=0&controls=0&loop=1&disablekb=1&showinfo=0" frameborder="0" allowfullscreen="allowfullscreen"></iframe>
</div>
! embed-responsive-16by9 을 embed-responsive-4by3으로 변경 가능
[ 2 ] 일반 영상으로 삽입하기
<iframe width="560" height="480" src="https://www.youtube.com/embed/Sp_VUiaCZEU?playlist=Sp_VUiaCZEU&autoplay=1&rel=0&controls=0&loop=1&disablekb=1&showinfo=0" frameborder="0" allowfullscreen="allowfullscreen"> </iframe>
iframe 삽입에 대한 YouTube Player API 참조 문서
https://developers.google.com/youtube/iframe_api_reference?hl=ko
Html5 비디오플레이어 소개글
http://www.cssreflex.com/2011/11/free-html5-video-players.html
유튜브 영상 첨부할 때 사용 가능한 옵션 총정리
http://spicaryn.tistory.com/23
반응형 웹사이트 모음
http://iropke.com/blog/archives/3428
'프로그래밍 > PHP' 카테고리의 다른 글
| PHP MySQL을 이용한 데이터베이스 편집 (0) | 2016.05.30 |
|---|---|
| PHP MySQL을 이용한 데이터베이스 생성 (0) | 2016.05.26 |
| PHP 함수 (0) | 2016.05.25 |
| PHP 배열 (0) | 2016.05.24 |
| PHP 변수와 문자열 (0) | 2016.05.24 |
PHP 데이터베이스 편집하기
1. 새로운 필드 추가하기

alter table mytable add tel char(3); 명령어로 tel필드를 추가합니다.
alter문으로 새로 추가된 필드는 null값을 갖습니다. 그럼 새로 추가된 tel필드의 null값을 수정해봅시다.
2. 테이블 내용 수정하기

update mytable set tel="111" where name="홍길동1"; 을 입력 후 확인해보면 홍길동1의 tel필드값이 111로 변경된 것을 확인할 수 있습니다.

나머지 필드도 이와 같은 방법으로 채워넣습니다.
3. 필드의 이름 및 자료형 변경하기

필드 이름을 tel에서 phone으로 변경하고 문자열의 수가 3개밖에 저장이 되지않기때문에 11개의 숫자가 저장되는 정수형으로 변경해보겠습니다

alter table mytable change tel phone int(11); 명령어로 필드의 이름과 자료형이 변경된 것을 확인 하실 수 있습니다.
4. 필드 삭제하기

alter table mytable drop phone; 명령어로 위에서 만들었던 phone 필드를 삭제합니다.
5. 테이블 복사하기

create table yourtable as select * from mytable; mytable의 내용으로 yourtable을 새롭게 만듭니다.
처음에 create table mytable (name char(10) not null, address char(10)); 명령어로 테이블을 만들었듯이
create table yourtable (select * from mytable); 로 ( )로 묶어서 명령어를 표현 할 수도 있습니다.
6. 테이블 이름 변경하기

rename table yourtable to deletetable; 위에서 복사한 yourtable을 삭제할 예정이므로 이름을 deletetable로 변경하고 결과를 확인합니다.
7. 테이블의 내용 삭제하기

delete from deletetable; 명령어로 deletetable의 내용을 삭제하고 테이블이 비어있는 것을 확인합니다.
8. 테이블 삭제하기

drop table deletetable; 명령어로 deletetable이 삭제되고, 기존의 mytable 하나만 남아있는 것을 볼 수 있습니다.
'프로그래밍 > PHP' 카테고리의 다른 글
| Youtube 영상 반응형으로 삽입하기 (0) | 2016.08.02 |
|---|---|
| PHP MySQL을 이용한 데이터베이스 생성 (0) | 2016.05.26 |
| PHP 함수 (0) | 2016.05.25 |
| PHP 배열 (0) | 2016.05.24 |
| PHP 변수와 문자열 (0) | 2016.05.24 |
PHP 데이터베이스 생성하기
1. MySQL 설치하기
PHP와 MySQL Apache를 묶어서 배포하는 통합프로그램인 WAMP 또는 APM 등을 설치합니다.
2. MySQL 실행하기

cmd창에 cd c:\wamp\bin\mysql\bin과 같이 MySQL이 설치된 폴더의 경로를 입력하여 설치폴더로 진입합니다

cmd창에 mysql -uroot -p1234를 입력하여 mysql에 접속합니다
(초기 아이디와 비밀번호는 root와 1234로 설정되어 있으며 -u와 -p는 -user와 -password를 뜻합니다)
3. 데이터베이스와 테이블 만들기
이제 본격적으로 데이터베이스와 테이블을 생성할 차례입니다

create database mydb; 명령어를 통해 mydb 데이터베이스를 생성합니다
Query OK, 1 row affected 라는 메시지를 확인 후
show databases; 명령어를 입력하여 생성된 mydb 데이터베이스를 확인합니다
필자는 기존에 생성했던 데이터베이스가 8개나 있는 것을 보실 수 있습니다

테이블을 생성하려면 우선 데이터베이스를 선택해야 합니다 use mydb; 명령어를 입력해서 데이터베이스를 선택합니다
그리고 create table mytable (name char(20) not null, address varchar(20)); 명령어로 테이블을 생성합니다
위 명령어를 설명을 덧붙이자면 20개의 문자를 저장할 수 있는 name필드와 20개의 가변문자를 저장할 수 있는 address 필드로 구성된 테이블을 만드는데 name필드는 값이 반드시 입력되어야 하므로 not null을 추가로 입력해주는 것입니다.

생성된 테이블을 show tables; 로 확인 할 수 있습니다 그리고 explain mytable; 명령어로 테이블의 구조를 볼 수 있습니다.
4. 데이터테이블에 내용 작성하기
이제 완성된 테이블에 값을 입력해볼까요?

insert into mytable (name, address) values("홍길동1","주소1"); 1,2번째 명령어처럼 한개씩 테이블 내용을 입력할 수도 있고
insert into mytable (name, address) values("홍길동3","주소3"),("홍길동4","주소4"); 3번째 명령어처럼 테이블필드의 이름은 생략 가능하고 한번에 여러개의 필드값을 입력할 수 있습니다.

마지막으로 select * from mytable; 명령어를 입력해서 mytable에 위에서 입력한 필드값이 추가된 것을 확인할 수 있습니다.
'프로그래밍 > PHP' 카테고리의 다른 글
| Youtube 영상 반응형으로 삽입하기 (0) | 2016.08.02 |
|---|---|
| PHP MySQL을 이용한 데이터베이스 편집 (0) | 2016.05.30 |
| PHP 함수 (0) | 2016.05.25 |
| PHP 배열 (0) | 2016.05.24 |
| PHP 변수와 문자열 (0) | 2016.05.24 |
PHP 함수
- PHP 함수란?
함수는 메소드라고도 불리며 크게 내장함수와 사용자정의 함수로 나뉩니다. 내장함수는 PHP에서 기본적으로 제공하는 함수를 말하고 사용자정의 함수는 이름에서도 알 수 있듯이 사용자가 필요에 따라 작성하는 함수입니다.
1) 사용자함수
- 예제

mix() 함수에서 "섞습니다" 라는 문장을 출력하게하고 mix함수를 실행시킵니다.
- 예제 결과

2) 함수의 파라미터
- 예제

$fruit1와 $fruit2를 mix()함수의 파라미터로 입력받아서 문장을 출력하는 코드를 작성합니다
- 예제 결과

3) 내장함수
PHP에는 수많은 내장함수가 있지만, 그 중에서 explode함수에 대해서만 다루어보겠습니다
- 예제

explode(분리 기준 문자열, 결과값을 저장시킬 변수)
explode함수의 첫번째 파라미터는 해당 파라미터의 문자를 기준으로 값을 분리시키게됩니다
그리고 두번째 파라미터는 문자로 값을 분리한 결과값을 저장시킬 변수가 위치하게됩니다
즉, $fruits를 ,를 기준으로 단어를 분리해서 $fruit변수에 대입하라는 것을 의미합니다. 출력값이 여러개이므로 자동으로 배열에 저장됩니다.
- 예제 결과

'프로그래밍 > PHP' 카테고리의 다른 글
| Youtube 영상 반응형으로 삽입하기 (0) | 2016.08.02 |
|---|---|
| PHP MySQL을 이용한 데이터베이스 편집 (0) | 2016.05.30 |
| PHP MySQL을 이용한 데이터베이스 생성 (0) | 2016.05.26 |
| PHP 배열 (0) | 2016.05.24 |
| PHP 변수와 문자열 (0) | 2016.05.24 |
PHP 배열
- PHP 배열이란?
배열은 간단하게 여러개의 값을 변수에 저장해야할때 사용하는 변수의 확장 개념으로 이해하시면 됩니다
- 예제

for문을 이용하여 $fruit 배열의 값들을 모두 출력합니다
- 예제 결과

'프로그래밍 > PHP' 카테고리의 다른 글
| Youtube 영상 반응형으로 삽입하기 (0) | 2016.08.02 |
|---|---|
| PHP MySQL을 이용한 데이터베이스 편집 (0) | 2016.05.30 |
| PHP MySQL을 이용한 데이터베이스 생성 (0) | 2016.05.26 |
| PHP 함수 (0) | 2016.05.25 |
| PHP 변수와 문자열 (0) | 2016.05.24 |
PHP 변수와 문자열
- PHP 변수란?
변수는 쉽게 말해 값이 들어가는 공간을 의미합니다
PHP에서는 모든 변수의 앞에는 '$' 기호를 붙입니다
변수를 선언할때나 사용할때도 마찬가지로 '$' 기호를 사용합니다
- 예제1

$fruit 변수에 banana 문자열을, $car 변수에는 Audi 문자열을 넣고
echo를 이용하여 출력하는 예제코드를 작성해봅시다
- 예제1 결과

- 예제2

예제1과 마찬가지로 작성하였으나 변수와 함께 문자열을 출력하고자 코드를 변경해보았습니다.
6라인의 "$fruit"과 "는"의 사이에 공백없이 입력 했을 경우 "$fruit는" 이라는 변수명으로 인식하여 오류가 발생합니다. 따라서 8라인처럼 "{ }" 기호를 이용하여 변수를 분리시켜주어야합니다.
- 예제2 결과

- 예제3

이런식으로 변수와 문자열을 마침표로 분리하여 작성하여도 { }를 씌운것과 동일한 결과물이 나타납니다.
- 예제3 결과

'프로그래밍 > PHP' 카테고리의 다른 글
| Youtube 영상 반응형으로 삽입하기 (0) | 2016.08.02 |
|---|---|
| PHP MySQL을 이용한 데이터베이스 편집 (0) | 2016.05.30 |
| PHP MySQL을 이용한 데이터베이스 생성 (0) | 2016.05.26 |
| PHP 함수 (0) | 2016.05.25 |
| PHP 배열 (0) | 2016.05.24 |